Glue, which also goes by the name of mastic, is probably the least expensive tile installation method and tiles happen to be one of the most popular flooring options available. How these things works are by making sure that this mastic adheres to the tile directly by the means of a sub-floor made of wood. This is then molded into maybe a piece of plywood or even a wooden backsplash. You can also create patterns that are mosaic designs. You can achieve this by making use of the mastic just as you would use a thinset. The only difference here is that in this case you really have to wait for the glue to tack before you start working. Then you also have to complete the project as quickly as possible so that you can get it done before the glue dries out a bit too much.
Let us now take a look at the step by step approach to gluing wood to tiles:
- Make sure that you remove all the objects from the area of the installation. Also, you should probably unscrew the switchplates that you have and also the outlet covers and have them then set aside. If there are covers for the registers, make sure that you unscrew them as well and hold on to the screws so that you can use them for the purposes of reinstallation. After you have done these things, you should set the stuff you unscrewed and registered aside and also just put them somewhere other than the area you are going to be working on.
- The next thing you should do is to try to level the surface you will be working on with the help of a wooden filler. Make sure that you fill in all the large holes and gaps. These holes and gaps can really prevent the adhesive from working properly. Make sure that you leave the filler out to dry. There should be instructions on how to do this from the manufacturer.
- The next thing on the agenda is to make measurements and then mark a vertical line and also a horizontal line across the entire center area of the area of installation. Make use of a line of chalk tool in order to snap a line across any areas that are larger. If you are trying to achieve a mosaic pattern, make sure that you trace or draw out the design of the pattern you want to create onto the surface of the wood itself.
- You should then try to spread the mastic by making use of an area that is about 3 sq feet of the area of installation by making use of a notched trowel directly onto the surface of the wall itself. If you trying to make a pattern that looks like a grid, make sure that you start right at the center and where the lines will be intersecting. The mastic that needs to be applied ought to be as thick as the tiles. What this basically means is that if the tiles you are working with are about a quarter of an inch thick, then the mastic that needs to be spread will be about ¼ inch in thickness as well.
- Make sure that you clean up all the excess mastic as you go about the process. Any drops or spills of the mastic that went anywhere beyond the area of installation should be scrapped off immediately. If you find that some of this mosaic has dried up on top of the surface, you can use a mastic remover.
- The mastic ought to be left to tack according to the instructions that have been provided by the manufacturer. It is important to note that most manufacturers will you a time limit that you have to wait for but you should always check the packaging of the mastic you bought in order to be sure of the specific requirements from that particular manufacturer.
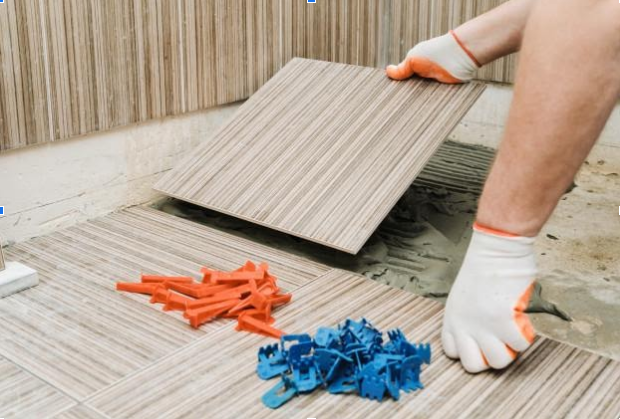
- After having completed all of the above, the tiles should be set into the mastic according to whatever design you have in mind. You need to press the tiles in a gentle manner to properly set them. After you have set about three tiles that are full-sized, you should ideally make use of a leveler in order to check if they are properly even. Any tiles or corners that are not even, need to be tapped down with the help of a mallet made of rubber. Once you have made sure that the tiles are properly level, continue finishing off the rest of the project in a similar fashion. The mastic should be left to cure for a period of about 24 hours.
- Make sure that you measure the perimeter tiles. This should be done by laying the tile completely flat on its surface. It should be touching the edge and it should also be overlapping the absolute last of the full-size installation of tiles on a row. Make sure that you mark the tiles when it overlaps the ones that have already been installed. You should then cut the tiles by using a tile cutter. Make sure that you install the tiles that have been cut just as you did with the ones that were full-sized.
Grout powder should be prepare by combining it with water so that it forms the consistency of something like peanut butter. You should make sure that you lift a bit of the grout with the help of a grout float made of rubber and then press it into the tile joints.