Hearing aids are remarkable devices, but they face constant threats from moisture, earwax buildup, and the general wear that comes with daily use. When these tiny electronics fail prematurely, the frustration is real—and so is the financial burden of repairs or full replacements that can cost thousands of dollars. Yet many hearing aid users overlook one of the simplest and most effective tools available for protecting their investment: the hearing aid dry box.
This guide offers a comprehensive look at how to use a dry box properly, alongside essential accessories like wax guards and ear domes, to extend your device’s lifespan and maintain optimal sound quality. Whether you live in a humid climate, lead an active lifestyle, or simply want to get the most from your hearing aids, establishing a consistent care routine makes all the difference. Clear, reliable hearing shouldn’t be compromised by preventable damage—and with the right approach, it won’t be.
Understanding the Enemy: Why Moisture Damages Hearing Aids
Hearing aids operate in one of the harshest environments imaginable for delicate electronics—right next to your skin, inside or behind your ear. Every day, they’re exposed to perspiration, ambient humidity, condensation from temperature changes, and the occasional splash from rain or unexpected encounters with water. Even something as routine as stepping from an air-conditioned room into summer heat generates condensation that can settle deep within the device’s components.

Once moisture penetrates a hearing aid, the damage compounds quickly. Internal circuitry begins to corrode, solder joints weaken, and microphones lose sensitivity. Receivers—the tiny speakers that deliver amplified sound into your ear canal—become muffled or produce crackling distortion. Over time, what starts as occasional static evolves into intermittent failures and eventually complete device breakdown. Earwax and skin oils make matters worse by trapping moisture against surfaces and clogging sound ports, creating a humid micro-environment where corrosion accelerates. Debris also attracts additional particles, forming blockages that muffle output even when electronics remain functional. Understanding these threats isn’t meant to alarm you—it’s meant to underscore why a consistent drying routine isn’t optional. It’s the single most impactful habit you can adopt to preserve both sound quality and device longevity, preventing small daily exposures from becoming expensive problems.
Your Essential Maintenance Tool: Choosing the Right Hearing Aid Dry Box
A hearing aid dry box is a specialized container designed to remove accumulated moisture from your devices overnight or during extended storage periods. At its simplest, it creates a controlled low-humidity environment that draws water vapor away from sensitive electronics, reversing the daily moisture buildup that would otherwise cause gradual deterioration.
The market offers two main categories. Desiccant-based containers are the most affordable option—they use silica gel beads or similar absorbent materials sealed inside a compact jar or case. You place your hearing aids inside, close the lid, and the desiccant pulls moisture from the air surrounding the devices. These work well for mild climates and occasional use, though the desiccant material needs replacement every one to three months depending on humidity levels. Color-changing indicators tell you when the beads are saturated and no longer effective.

Electric dry boxes represent a more thorough solution. These units use gentle heat, fan-driven airflow, or a combination of both to actively evaporate trapped moisture. Many also incorporate UV-C light to sanitize surfaces, killing bacteria that cause odor and ear infections. Timer functions allow you to set drying cycles—typically three to eight hours—so the process completes while you sleep without risk of over-exposure to heat. Some models are compact enough for travel, while others are designed as permanent bedside stations.
Choosing the right hearing aid dry box depends on your circumstances. If you exercise frequently, live in a tropical or highly humid region, or perspire heavily, an electric model with consistent drying performance is worth the investment. Those in drier climates with relatively sedentary routines may find a quality desiccant container perfectly adequate. Consider physical size if you travel often, and verify that the interior accommodates your specific hearing aid style—whether behind-the-ear, in-the-ear, or receiver-in-canal models. Whichever type you choose, consistency of use matters far more than the sophistication of the device itself.
The Step-by-Step Guide to Using Your Dry Box Effectively
Owning a dry box only matters if you use it correctly and consistently. The following routine, performed every night before bed, takes less than five minutes and dramatically reduces moisture-related damage over the life of your hearing aids.
Step 1: Preparing Your Hearing Aids
Before placing your devices in the dry box, take a moment to prepare them properly. Use a soft, dry cloth or a dedicated hearing aid brush to gently wipe down all exterior surfaces, removing any accumulated perspiration, oils, or visible debris from the day. Pay particular attention to microphone ports and sound outlets where wax tends to collect. Next, open the battery compartment doors fully—this serves two purposes. It breaks the electrical circuit to conserve battery life overnight, and more importantly, it creates an additional airway that allows trapped moisture inside the compartment to escape during the drying cycle. If your hearing aids use rechargeable batteries that cannot be removed, simply ensure the charging contacts are clean and follow your manufacturer’s specific storage guidance. Take a quick look at the wax guard and sound bore; if you notice visible buildup, address it before drying so the box can work on moisture rather than fighting through a layer of debris.
Step 2: Operating Your Specific Dry Box
For desiccant-based containers, check the color indicator on your silica gel before each use. Fresh beads typically appear orange or blue and shift to white or pink when saturated. If the color has changed, either replace the desiccant packet or regenerate reusable beads according to the product instructions—usually by microwaving or oven-drying them. Place your hearing aids inside with battery doors open, seal the lid tightly, and leave them overnight for a minimum of six hours. For electric dry boxes, position the hearing aids on the internal rack or holder so air can circulate freely around all surfaces. Select your drying cycle—most units offer settings between three and eight hours, with longer cycles suited to particularly humid days or heavy perspiration. If your model includes UV-C sanitization, activate it according to the manufacturer’s guidelines; typically one cycle per night is sufficient without risking material degradation. Close the lid securely and let the unit run its full program without interruption.
Step 3: Post-Drying Best Practices
When you retrieve your hearing aids in the morning, allow them to sit at room temperature for about sixty seconds before inserting them. This brief acclimatization period lets any residual warmth from an electric box dissipate, preventing condensation from forming when the warm device meets cooler ear canal air. Before closing the battery doors, inspect the compartment interior—it should appear completely dry with no visible droplets or fogging. Insert fresh batteries if needed, or close the rechargeable compartment, and perform a quick listening check. If sound seems muffled or distorted despite a full drying cycle, the issue may be wax blockage rather than residual moisture, signaling it’s time to replace your wax guard.
Beyond the Dry Box: Integrating Wax Guards and Ear Domes for Complete Care
A dry box addresses moisture, but hearing aids face other persistent threats that require their own dedicated solutions. Wax guards and ear domes work alongside your drying routine to form a complete protective system—each component handling a different vulnerability that, left unmanaged, undermines everything the dry box accomplishes.
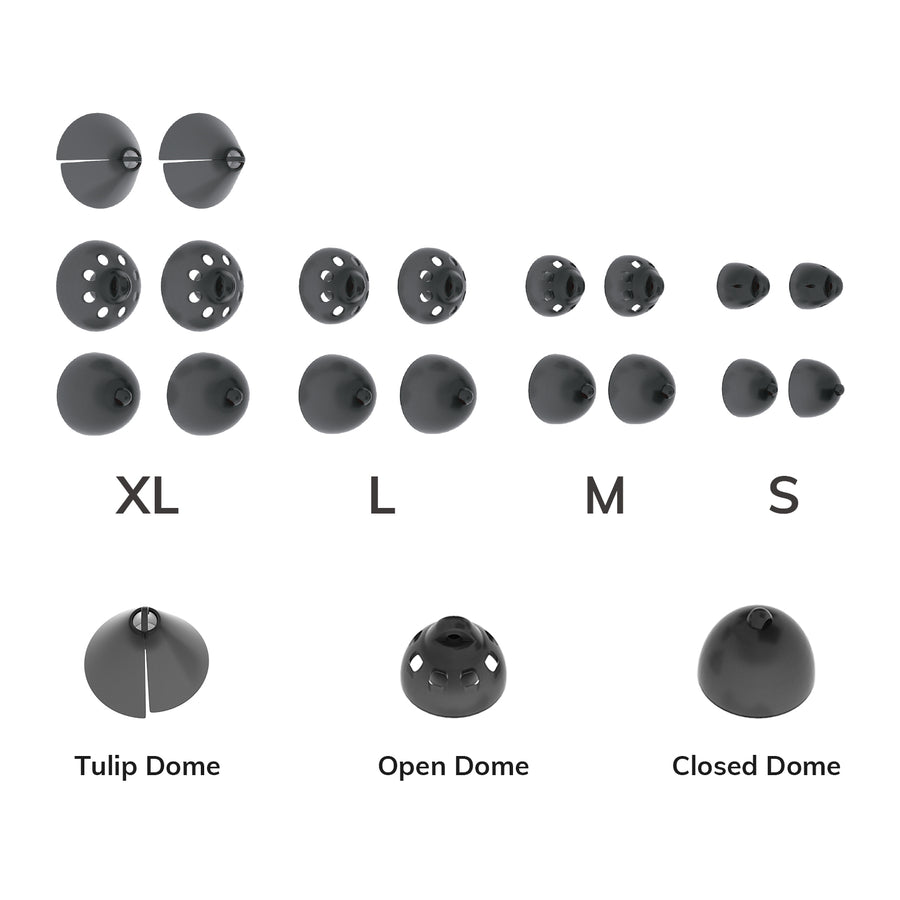
Wax guards are tiny filters that sit at the sound outlet of your hearing aid receiver, acting as a physical barrier between your ear canal’s natural wax production and the device’s most sensitive component. Without them, cerumen migrates directly into the receiver, coating the speaker diaphragm and eventually causing permanent damage that no amount of drying can reverse. Replacing wax guards is straightforward—most systems use a small stick tool with a fresh filter on one end and a removal prong on the other. You pull out the old guard and press in the new one in a single motion. Check them weekly and replace immediately when you notice discoloration, visible blockage, or any reduction in sound clarity. Most users find replacement every two to four weeks keeps performance consistent.
Ear domes—the soft silicone tips that sit inside your ear canal on receiver-in-canal models—serve dual roles in comfort and hygiene. They create a proper acoustic seal for optimal sound delivery while also shielding the receiver opening from direct contact with skin oils and moisture. Over time, domes lose their flexibility, discolor, accumulate residue that resists cleaning, or develop small tears that compromise the seal. Replace them every one to two months, or sooner if you notice fit changes or visible deterioration. Many modern hearing aid brands, including ELEHEAR, provide compatible replacement domes and wax guards designed for easy at-home maintenance. When combined with nightly dry box use and regular wax guard changes, fresh domes complete a maintenance triangle that addresses moisture, debris, and physical wear simultaneously—keeping your hearing aids performing at their best between professional service appointments.
Common Mistakes to Avoid and Long-Term Maintenance Tips
Even dedicated hearing aid owners make errors that undermine their care efforts. One of the most common is forgetting to open battery compartment doors before placing devices in the dry box—this single oversight traps moisture in the very space most vulnerable to corrosion. Others make the mistake of using household heat sources like hair dryers or radiators, which generate temperatures far exceeding what delicate electronics can tolerate, warping plastic housings and damaging adhesives that hold components together. Leaving expired desiccant in a container is equally counterproductive; saturated silica gel can actually release moisture back into the enclosed space, reversing its intended purpose.
Over-drying presents its own risks. Running electric dry boxes on extended cycles beyond manufacturer recommendations can degrade silicone ear domes, dry out lubricants on moving parts, and stress battery seals. Follow the recommended cycle length and resist the temptation to assume longer means better. On a weekly basis, inspect wax guards under good lighting, clean microphone ports with the provided brush tool, and examine domes for tears or hardening. Monthly, wipe down the dry box interior, check desiccant indicators or replace packets, and assess whether ear domes need swapping. Every three to six months, schedule a professional cleaning with your audiologist—they have vacuum tools and specialized equipment that reach areas your home routine cannot. This layered approach, combining daily drying with periodic deeper maintenance, protects your investment over years rather than months, saving significant repair costs while ensuring your hearing remains consistently clear and reliable.
Building a Sustainable Hearing Aid Care Routine
Caring for your hearing aids doesn’t require technical expertise or hours of effort—it requires consistency and the right tools. A hearing aid dry box stands at the center of this routine, quietly undoing the moisture damage that accumulates with every hour of wear. When paired with regular wax guard replacements and timely ear dome changes, you create a protective system that addresses the three primary threats to your devices: humidity, debris, and physical degradation.
The steps outlined here are deliberately simple because sustainable habits need to be. Five minutes each evening—wiping down your devices, placing them in the dry box with battery doors open, and letting the drying cycle run overnight—translates into years of additional service life and consistently clear sound quality. Weekly inspections and monthly maintenance checks catch small issues before they escalate into costly repairs.
Your hearing aids represent a significant investment in your quality of life, your relationships, and your connection to the world around you. Protecting that investment with proactive care isn’t just practical—it’s empowering. You have the knowledge and the tools. Start tonight, stay consistent, and enjoy the confidence that comes with hearing aids that perform exactly as they should, day after day.