google pdf editors is a powerful and popular suite of office applications, providing users with a range of tools. WPS Office is also a well known powerful suite with features for word online processing, spreadsheet management, and presentation creation. One of the most compelling features of WPS Office is its ability to utilize macros, which allow users to automate repetitive tasks, streamline workflows, and boost productivity. In this tutorial, we will guide you through how to enable macros in WPS Office so that you can take advantage of this powerful functionality and create customized workflows tailored to your needs.
What are Macros?
Alt tag: WPS Macro
Before we dive into the tutorial, let’s briefly understand what macros are. In the context of WPS Office, a macro is a series of commands and actions that can be recorded and played back to automate tasks. Macros are particularly useful for tasks that require performing the same actions repeatedly, such as formatting documents, generating reports, or data manipulation in spreadsheets. By recording a macro once, you can execute it with a single click or keyboard shortcut, saving valuable time and effort.
-
Step 1: Launching WPS Office
Alt tag: WPS Office
First, make sure you have WPS Office installed on your computer. If you don’t have it, you can download and install it from the official website of WPS Office.
Once WPS Office is installed, launch the application by clicking on its icon or searching for it in your computer’s applications list.
-
Step 2: Opening a Document
To enable macros, you’ll need to work with a document (a word processing file or a spreadsheet). Open an existing document or create a new one by clicking on the “New” button and selecting the appropriate document type (e.g., “New Writer Document” for a word document or “New Spreadsheets” for a spreadsheet).
-
Step 3: Accessing the Macro Menu
- With your document open, you can access the macro menu by following these steps:
- For WPS Writer (Word Processing):
- Click on the “View” tab in the top menu.
- Look for the “Macros” dropdown menu in the toolbar.
- Click on the “Macros” dropdown to reveal additional options.
Alt tag: Macro Menu
For WPS Spreadsheets:
-
- Click on the “Tools” tab in the top menu.
- Look for the “Macro” option in the dropdown menu.
- Click on “Macro” to access the macro-related functions.
-
Step 4: Enabling Macros Security
Before you can create or run macros, you need to adjust the macro security settings. This step is essential to protect your computer from potentially harmful macro code. WPS Office provides different security levels for macros. Choose the appropriate level based on your trust in the macros you’ll be using.
In the macro menu, click on “Security” (for WPS Writer) or “Security Settings” (for WPS Spreadsheets).
You’ll see a list of security levels ranging from “High” to “Low.” Choose a security level that suits your needs. “Medium” is a recommended starting point, as it allows macros from trusted sources and digitally signed macros.
Once you’ve selected your desired security level, click “OK” to apply the changes.
-
Step 5: Recording a Macro (Optional)
- If you want to create a custom macro for a specific task, you can record it within WPS Office. Recording a macro captures all the actions you perform in a document, which can later be replayed with a single click.
- In the macro menu, click on “Record” (for WPS Writer) or “Record Macro” (for WPS Spreadsheets).
- A new window will appear, asking you to name the macro and assign a shortcut key for quick access.
- Perform the actions you want to record in your document. WPS Office will capture these actions and store them as a macro.
When you finish recording, click on “Stop Recording” (for WPS Writer) or close the dialog and stop recording in WPS Spreadsheets.
-
Step 6: Running a Macro
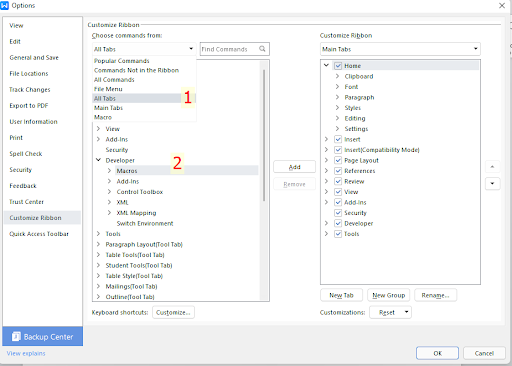
Alt tag: Adding Macro
- Now that macros are enabled, you can easily run them to automate tasks:
- In the macro menu, click on “Macros” (for WPS Writer) or “Macro” (for WPS Spreadsheets).
- If you previously recorded a macro, you’ll find it listed here. Select the desired macro from the list.
- Click on “Run” to execute the selected macro.
Conclusion
Enabling macros in WPS Office opens up a world of possibilities for customized workflows and increased productivity. By automating repetitive tasks, you can focus on more creative and critical aspects of your work. Remember always to exercise caution when enabling macros and only run those from trusted sources. Now that you’ve learned how to enable macros in WPS Office, explore and experiment with this powerful feature to tailor your office experience to your specific needs. Happy macroing!