How amazing it is to be able to entertain the entire world with your abilities and stunts! Scooters are in the same boat. If you prefer scooters to any other mode of transportation, you must be quite environmentally conscious. The scooter ramp gives you the chance to test your skills with scooters. Different brands are available in stores, but if you want to create your scooter ramp, we can help. It is quite simple to construct one and will save you money.
You can make a scooter ramp in whatever size you like, but we’ve illustrated one that’s a specified size. So, here are the stages and directions to follow to construct a scooter ramp:
Step 1: Grab the stuff needed
The first step requires determining and obtaining the materials needed to build a scooter ramp. These are
- 2 pieces of 4×8 ¾ inch plywood
- Box of one 5/8 inch screws
- Five 8 foot 2×4 boards
- Tape measure
- Pencil
- Circular saw
- Drill with the head drill bit
- 3/16 inch drill bit
- 3/8 inch drill bit
- One piece of ¼ inch plastic
All of these tools may be found in local hardware stores or metal shops. So, first, acquire all of these tools, and then go through the instructions below one by one.
Step 2: Cutting pieces
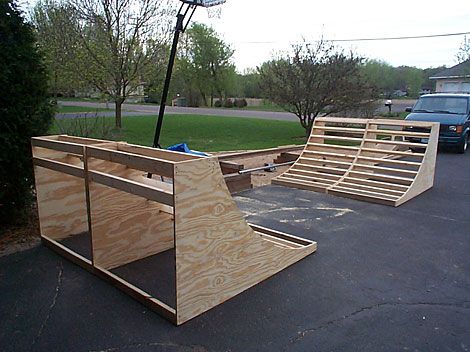
Start with plywood pieces now. Cut these pieces to construct the ramp’s triangle sides. The right angles ought to have 1’6″ and 5’6″ short sides. To create another side of the ramp, you’ll need to cut two of these triangles.
Step 3: Cutting support pieces
The support components must then be cut. Make support pieces out of 10 2x4s by cutting them 3 feet tall and 10.5 inches broad.
Step 4: Making the bottom base
Structure the bottom foundation of the ramp once the sides and support parts have been completed. Cut them out and join the two triangles together. Allow the two triangles to stand with their long, flat sides flush against the ground. The rear and front 2x4s boards should be joined to the bottom. You’ll need a drill and 12-inch screws to put them together.
Step 5: Fixing ramp support
Drill the 24 boards vertically down the inside of the ramp to provide ramp support. In this situation, you should start drilling from the bottom and work your way up, staying as close to the top edge of the ramp as possible.
Step 6: Framing the top
The construction of the top is the following phase. To do so, adjust the plywood top and remove it from the remaining unusable pieces. Maintain a smooth surface for the plywood just on top of the construction before reattaching it with drill and screws. This time, the screws must be longer.
Step 7: Placing cover
This is the final stage in the process of covering your ramp with plastic. Make three 3/16″ drills on the bottom of the hill with your drill machine. Place the bit of plastic on the bottom, where it will contact the floor, as well. Drill shorter screws thru the plastic and 3/16″ drills you just created with your screwdriver bit.
Step 8: Attaching steel bottom
At the bottom, place a 4-foot x 10-inch piece of steel. To accomplish so, use two 34-inch screws and a 3/16-inch drill bit to drill two holes on either side of the piece, then countersink the holes using that drill bit. The steel bottom will be securely held in place as a result of this.
After you’ve completed the preceding stages, you may get on your scooter and continue wowing people with your incredible movements. A steel bottom could be added by drilling two holes in any side of the steel and countersinking the holes to secure it.